Saturday, December 12, 2009

Advent Calendar

Now I have seen MANY neat ideas for advent calendars. I pulled my idea from Family Fun Magazine a couple of Christmas's ago. They took kids socks and hung then on a ribbon and filled with goodies each day. I liked the idea, but never found the socks I liked. Then I saw on ravelry, Annie Purls idea for knitting a bunch of small socks for christmas - and BOOM the inspiration hit. Spring of 2008, I started knitting 22 small socks and a couple of bigger socks. I had them done last Christmas and I am reusing this Christmas. In 2008 K got a piece of choclate each day and a little animal. This year is a getting a fun size bag of M&M's and a small character from Wall-E, Cinderella, or Alddin. I have the character mixed, so she is getting a same set about every three days. I was able to find these sets at the Disney store when they were on sale. Unfortunately they had sold out of Sleeping Beauty already - which is K's favorite.


All the socks knitted up. The two larger one are for Dec 6th (St.Nick Day) and Dec 24th.


2008 hanging up


The first half of 2009

Last half of 2009
The garland is our christmas garland and I have have clothspins hanging up the stocking and they have numbers on so we know where we are at each day.


Thursday, December 10, 2009

Stacks of Color


Doesn't look nice! Rows of colors ready to be played with. This is 7 different favors of Kool aid made into play dough, ready to be given as gifts to K's friends. I am still trying to figure out how to divide up what I have and who is getting it, but I know it will get used. What I like about this recipe is how soft the dough is and how it smells.

The recipe for this is super easy.
2 cups of water
2 cups of flour
1/3 cup salt
2 tbsp of vegetable oil
and 2 packages of kool aid

Boil the water, and add in the oil. Then add the dry ingredient and mix up. it helps to knead the dough a little to finish mixing in the flour and color. I was able to fill 7 large size baby food containers (the gerber brand). I loved that I have reused some containers, and made a great gift for our friends kids. I even have labels on hand to use!


Wednesday, November 11, 2009

Snack days for preschool

My Daughter's preschool has a policy of no sugary snack for snack time. Which is great. And they also set it up that about every 6 weeks your child brings in the snack and gets to bring in a show and tell item. For K's first snack this year I did grapes and pretzels. The other challenge is the snacks has to be individually wrapped so the kids can pass out the snack. So in my challenge to watch my use of items (ie plastic bags), I came up with a reusable solution. K likes yogurt especially the Dora version. So I have been saving the cups and sent her grapes in the washed out cups with a small amount of wrap over them. Pretzels I get a big container in the fall at Sam's club of the Bats and Jacks from Utz Chips. So snack time has rolled around for the 2nd time. This time it is Carrots and Pretzels. Lucky because I get to use the the yogurt cups for the carrots again and I happen to still have some Halloween Pretzels. I love when things work out.

Carrots all in the cups ready to go.

Saturday, November 07, 2009

cleaning the lot


A view of the NE corner of the lot

What do you with a wooded lot that needs some TLC. When we bought this house in April 2009, it had an awesome amount of stuff done on the inside, but the yard needed some TLC. I slowing am coming up with ideas. This summer I tried a crazy idea. I posted on Craigslist trees for sale. Now we had a number of young saplings that were allowed to grow, without any concern to where they were growing, or how thick the trees were getting. So if anyone was interested in the trees - they just needed to be able to come out and dig them out. One guy took me up in the offer and he bought his tractor in, and dug some trees out today. I liked doing this - becasue I didn't want to just burn trees, and I wanted to preserve some trees, since we have enough trees cut every year. So this crazy little offer on Craigslist allowed me to get rid of about 10 or 12 trees to be replanted. And today - I feel like I did my part to help make the world a better place.

A view of the west side - about 6 trees came out of here.


And the SW side - about 5 trres came out of here.

Hopefully next summer, the lot will dry out faster and I'll get a little extra sun to my new garden area. Which I now need to take dirt out and move it to fill holes made by the trees. Happy transplanting for me!!

Thanksgiving decor

I few years ago I was working as a teacher at a major craft store. To help out I would do demos on the weekends. One weekend in between a couple of demo I played with an idea of a table runner of leaves. I think I had saw an idea in a magazine, but didn't want to buy it (I don't remember where I saw the idea). Anyway I looked around the store at the fall garlands and found some I liked. I got some peices of felt and was ready to create. I had my glue gun and glued the pieces of felt together in one long piece. I then cut the leaves off the garland and began to arrange them in a cool design. Working from both sides I worked the design toward the center. And in a few minutes I had a beautiful table runner. I will note that the garland I bought was at least $9 at regular price - but could have been higher since the leaves have a nice veletly look and feel.  But if you score some garland on sale or clearnace in good shape - this can be very cheap!

here is how it looks

and the back with the felt.

Wednesday, November 04, 2009

Creating Halloween 2009

Since we moved to a new house this year I needed some new ideas for my Halloween decoration. The last few years I had the porch and a walkway to decorate for Halloween. This year I have a longer porch - but not a great walkway to work with yet.

I first found an idea in an old Lesisure arts book "Sew No More - Holiday Decor". This from part of there hard cover book series. The idea found was to make large standing ghost for the porch.


In their version The ghosts were holding candy corn pieces with beads. I was looking for something to say Halloween; so I went with "Trick or Treat". I think I'll mix it up over the years with "Happy Halloween" or other things. Another thing I did differently was the heads. These ghosts were meant to be inside or well protected. The orginal idea had the ghosts heads made of poly fil and batting. I decided to go a little different. I was able to make Paper mache heads with balloons. This was a great project because it allowed my daughter to get involved.

So here we are getting started. I used a great recipe from family fun -  paper mache recipe. It was easy to use and made a lot and could be saved for a little bit.
Here is Katie showing off her work.

and all of the finished pieces.

You might be thinking, there are only 2 ghosts there. Well we used two balloons there, and two more in the trees - pictures and info to come later. We also had a fun experiment with a pinata; which is another story for another day.
We used these balloons and did the next week a quick coat of white paint, so that alot of the newsprint wouldn't show through the fabric. I then took these heads and filled them with spray expanding foam. I did alot of experimenting here. I think next year when I fill them I'm going to have them upside down to begin with. When the heads were sitting in the boxes to be filled the foam didn't expand up as much. but I noticed when I tilted a few the foam moved more the way I wanted it to. This gave my heads with some wieght that when I covered them with fabric they didn't collasped and they held up over the season. I plan on making new each year, since the only thing I don't think will last is the heads.


At this point you can see the head on the tomato cage frame. The book suggested a 36" frame - but at the end of season I could only find 54". I think in the end it was better for me because they stood out better. I duct taped a couple of 5/8" dowel rods as arms to the head - since there was no bar to use there.
 
From there it is add the fabric. I love the way fabric is coming these days. I was able to buy basic white muslin at Joann's in 108" width. This meant for the 2 ghosts I got 6 yds, and with a coupon wasn't that bad. Even better I'll be able to wash the fabric when I take the ghosts down and reuse for next year - no plastic! I drapped the fabric over the frame and took some black grosgrain ribbon to tie a bow at the neck.

The words were an old project I love. Back a few years ago I saw a banner in made in Leisure Arts "Spirit of Christmas" book. They took illustration board and cut out letter made from blowing up a font to 600 pt. Well I took this idea and traced the letters on to fun foam and then cut out the letters. This way they are water proof and wear a little better. I then took my scrapbooking eyelets and made holes at the top for some yarn to hold the letters. I'll do another post about this later - since I have done these letters for many projects.  Either way, they held up and look good to use for next year.

Enough about these - I'll do more posts on the rest of the decor shortly.

Friday, February 06, 2009

mitred football


Football pattern


This pattern was created when I was working on mitred square blocks for my daughter. When I got the fourth block done it looked like half of a football. I like patterns when there is limited finishing and sewing – so I like to pick up stitches when I can. I hope you enjoy these as much as I have. The football makes a great gift for babies and toddlers as well as that favorite football fan in their favorite school/team colors.

Gauge – not necessary, I have found Worsted weight makes a nice size ball.

Supplies –
One ball of sugar and cream in Brown and one in white (or any Favorite worsted weight yarn in the colors you want)
Pair of size 7 needles or favorite needle for your yarn choice


First Square
Cast on 31 stitches in brown/MC
Row 1: Knit 14, slip 1, k2tog, PSSO, K 14
Row 2: knit 14, Purl 1, knit 14
Row 3: Knit 13, sl1, K2tog, PSSO. K13
Row 4: K13, P1, K13
Row 5: K12, Sl1, K2tog, PSSO, K12
Row 6: K12, P1, K12
Row 7: K11, Sl1, K2tog, PSSO, K11
Row 8: K11, P1, K11
Row 9: K10, Sl1, K2tog, PSSO, K10
Row 10: K10, P1, K10
Row11: K9, Sl1, K2tog, PSSO, K9
Row 12: K9, P1, K9
Row 13: K8, Sl1, K2tog, PSSO, K8
Row 14: K8, P1, K8
Row 15: K7, Sl1, K2tog, PSSO, K7
Row 16: K7, P1, K7
Row 17: K6, Sl1, K2tog, PSSO, K6
Row 18: K6, P1, K6
Row 19: K5, Sl1, K2tog, PSSO, K5
Row 20: K5, P1, K5
Row 21: K4, Sl1, K2tog, PSSO, K4
Row 22: K4, P1, K4
Row 23: K3, Sl1, K2tog, PSSO, K3
Row 24: K3, P1, K3
Row 25: K2, Sl1, K2tog, PSSO, K2
Row 26: K2, P1, K2
Row 27: K1, Sl1, K2tog, PSSO, K1
Row 28: K1, P1, K1
Row 29: Sl1, K2tog, Psso, cut yarn and secure


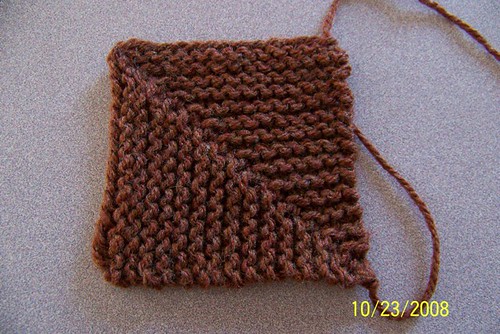
Here is what the first Square should look like


Second square
Cast on 16 stitches and then pick up 15 from one side for First Square in brown/MC.
Follow directions for First Square
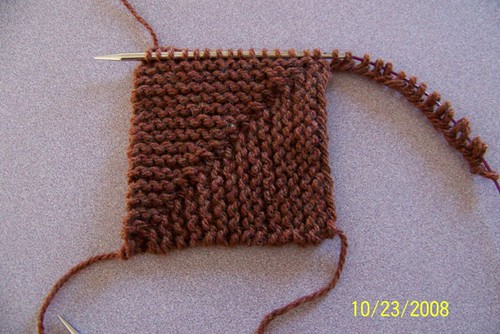
What the cast on and pick up stitches for the second look like

The first two squares

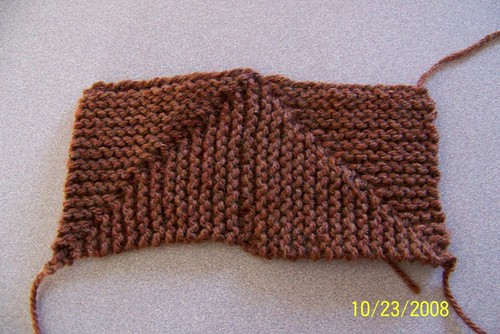
This is the center four squares that make the center of the ball

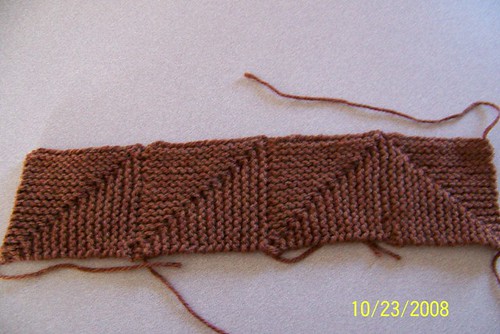
Third and Fourth Square you cast on and pick up the same amount of stitches. You will have a row of four squares when you are done.

The sides
Along one of the long sides of the strip of 4 squares pick up 62 stitches with the white/CC yarn.
Row 1: K14, sl1, K2tog, PSSO, k28, sl1, K2tog, PSSO, k14
Row 2: Knit 14, purl 1, K28, P1, K14
Row 3: K13, sl1, K2tog, PSSO, k26, sl1, K2tog, PSSO, k13


Then Pick up Brown/MC Yarn
Row 4: K13, P1, K26, P1, K13
Row 5: K12, sl1, K2tog, PSSO, k24, sl1, K2tog, PSSO, k12
Row 6: K12, P1, K24, P1, K12
Row 7: K11, sl1, K2tog, PSSO, k22, sl1, K2tog, PSSO, k11


Then Pick White/CC yarn up
Row 8: K11, P1, K22, P1, K11
Row 9: K10, sl1, K2tog, PSSO, k20, sl1, K2tog, PSSO, k10
Row 10: K10, P1, K20, P1, K10
Row 11: K9, sl1, K2tog, PSSO, k18, sl1, K2tog, PSSO, k9


Then Pick up Brown/MC and finish side
Row 12: K9, P1, K18, P1, K9
Row 13: K8, sl1, K2tog, PSSO, k16, sl1, K2tog, PSSO, k8
Row 14: K8, P1, K16, P1, K8
Row 15: K7, sl1, K2tog, PSSO, k14, sl1, K2tog, PSSO, k7
Row 16: K7, P1, K14, P1, K7
Row 17: K6, sl1, K2tog, PSSO, k12, sl1, K2tog, PSSO, k6
Row 18: K6, P1, K12, P1, K6
Row 19: K5, sl1, K2tog, PSSO, k10, sl1, K2tog, PSSO, k5
Row 20: K5, P1, K10, P1, K5
Row 21: K4, sl1, K2tog, PSSO, k8, sl1, K2tog, PSSO, k4
Row 22: K4, P1, K8, P1, K4
Row 23: K3, sl1, K2tog, PSSO, k6, sl1, K2tog, PSSO, k3
Row 24: K3, P1, K6, P1, K3
Row 25: K2, sl1, K2tog, PSSO, k4, sl1, K2tog, PSSO, K2
Row 26: K2, P1, K4, P1, K2
Row 27: K1, sl1, K2tog, PSSO, K2, sl1, K2tog, PSSO, k1
Row 28: K1, P1, K2, P1, K1
Row 29: Sl1, K2tog, Psso twice
Row 30: Bind off

Complete second side.

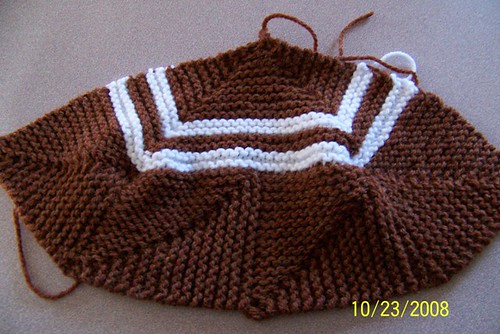
Here is how one side look done with the second side ready to start.

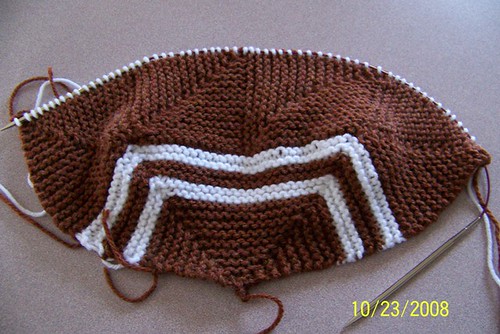
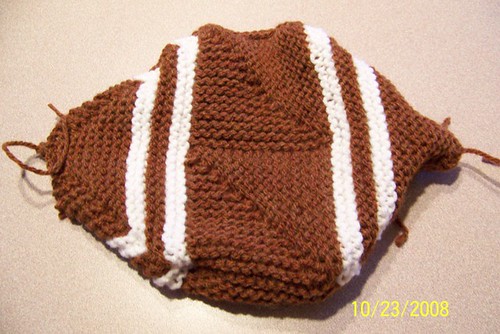
Both sides done – before sewing

Sew up Side seam and stuff as you get to end of your seam. And enjoy the Football.

Any questions contact Sarah – Creativegal42 on Raverly.
For Personal Use only.